How to Burn KVCD on Mac
iVCD can burn video to KVCD
Requirements
- iVCD
- source movie(s)
- required component installed if converting FROM avi, divx, xvid, mpeg-2, wmv (see iVCD System Requirements)
- a CD-R or CD-RW
Instructions
- If you haven’t already done so, download and install any required component. (see iVCD System Requirements)
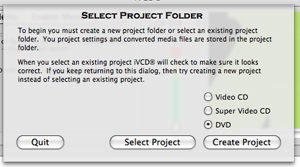
- Create a new project folder or open an existing one.
Storing your movie and it’s settings in a project folder makes it easy to save your information so you can pick up where you left off, instead of having to finish your project in one sitting, which is often difficult to do at first. It also makes it easy to create more copies of a DVD once you have perfected your project.
- To open an existing project,
- select “Select Project” and navigate to an existing project.
- To Create a New project,
- From the Project Folder Dialog, select “Create Project”.
- Name the new project folder. (we suggest the folder name end with MPEG). The project will be configured using the default settings. (To change the default settings, use the Preferences panel.)
- To open an existing project,
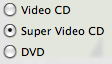
- Choose “Video CD” as the Media Type

- Modify the settings. If you are going to show the KVCD on a TV, choose the TV Broadcast Standard. There are three TV Broadcast Standards in the world, NTSC, PAL and SECAM.
If you are going to show the video on a TV in a place in the world that uses the PAL or SECAM (e.g. Europe), choose “PAL”.
Otherwise, choose “NTSC” (North America, Japan). - Tick the “Expert Settings KVCD” tick box.
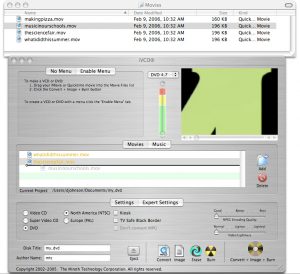
- Drag in your source movie files to the movie list. (Ignore the Green/Amber/Red indicator bar at the top of the iVCD screen. It is used when burning a disc.)
- To delete a movie/playlist from the Movie List
- Click the “Movies” tab
- Single-click the movie/playlist to select it
- Click the “Delete” button
- To add a movie,
- Drag it to the Movies List
- Using the Finder, find a movie and single-click it to select it
- Click the “Movies” tab
- To delete a movie/playlist from the Movie List
- Click the one-step “Convert + Image + Burn” button and Insert a blank disk.
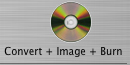
- Because converting to MPEG takes a long time, (at least four times as long as the movie length and even longer on slower machines), we suggest you run this job overnight.
- Once the burn has completed successfully, test the disc on the type of equipment your audience will be using, especially before making multiple copies.
How to Burn xVCD on Mac
iVCD can burn video to xVCD
Requirements
- iVCD
- source movie(s)
- required component installed if converting FROM avi, divx, xvid, mpeg-2, wmv (see iVCD System Requirements)
- a CD-R or CD-RW
Instructions
- If you haven’t already done so, download and install any required component. (see iVCD System Requirements)
- Create a new project folder or open an existing one.
Storing your movie and it’s settings in a project folder makes it easy to save your information so you can pick up where you left off, instead of having to finish your project in one sitting, which is often difficult to do at first. It also makes it easy to create more copies of a DVD once you have perfected your project.- To open an existing project,
- select “Select Project” and navigate to an existing project.
- To Create a New project,
- From the Project Folder Dialog, select “Create Project”.
- Name the new project folder. (we suggest the folder name end with MPEG). The project will be configured using the default settings. (To change the default settings, use the Preferences panel.)
- To open an existing project,
- Choose “Video CD” as the Media Type
- Modify the settings. If you are going to show the xVCD on a TV, choose the TV Broadcast Standard. There are three TV Broadcast Standards in the world, NTSC, PAL and SECAM.
If you are going to show the video on a TV in a place in the world that uses the PAL or SECAM (e.g. Europe), choose “PAL”.
Otherwise, choose “NTSC” (North America, Japan). - In the “Expert Settings”, set your bitrate.
- Drag in your source movie files to the movie list. (Ignore the Green/Amber/Red indicator bar at the top of the iVCD screen. It is used when burning a disc.)
- To delete a movie/playlist from the Movie List
- Click the “Movies” tab
- Single-click the movie/playlist to select it
- Click the “Delete” button
- To add a movie,
- Drag it to the Movies List
- Using the Finder, find a movie and single-click it to select it
- Click the “Movies” tab
- To delete a movie/playlist from the Movie List
- Click the one-step “Convert + Image + Burn” button and Insert a blank disk.
- Because converting to MPEG takes a long time, (at least four times as long as the movie length and even longer on slower machines), we suggest you run this job overnight.
- Once the burn has completed successfully, test the disc on the type of equipment your audience will be using, especially before making multiple copies.
How to Burn xSVCD on Mac
iVCD can burn video to xSVCD
Requirements
- iVCD
- source movie(s)
- required component installed if converting FROM avi, divx, xvid, mpeg-2, wmv (see iVCD System Requirements)
- a CD-R or CD-RW
Instructions
- If you haven’t already done so, download and install any required component. (see iVCD System Requirements)
- Create a new project folder or open an existing one.
Storing your movie and it’s settings in a project folder makes it easy to save your information so you can pick up where you left off, instead of having to finish your project in one sitting, which is often difficult to do at first. It also makes it easy to create more copies of a DVD once you have perfected your project.- To open an existing project,
- select “Select Project” and navigate to an existing project.
- To Create a New project,
- From the Project Folder Dialog, select “Create Project”.
- Name the new project folder. (we suggest the folder name end with MPEG). The project will be configured using the default settings. (To change the default settings, use the Preferences panel.)
- To open an existing project,
- Choose “Super Video CD” as the Media Type
- Modify the settings. If you are going to show the xVCD on a TV, choose the TV Broadcast Standard. There are three TV Broadcast Standards in the world, NTSC, PAL and SECAM.
If you are going to show the video on a TV in a place in the world that uses the PAL or SECAM (e.g. Europe), choose “PAL”.
Otherwise, choose “NTSC” (North America, Japan). - In the “Expert Settings”, set your bitrate.
- Drag in your source movie files to the movie list. (Ignore the Green/Amber/Red indicator bar at the top of the iVCD screen. It is used when burning a disc.)
- To delete a movie/playlist from the Movie List
- Click the “Movies” tab
- Single-click the movie/playlist to select it
- Click the “Delete” button
- To add a movie,
- Drag it to the Movies List
- Using the Finder, find a movie and single-click it to select it
- Click the “Movies” tab
- To delete a movie/playlist from the Movie List
- Click the one-step “Convert + Image + Burn” button and Insert a blank disk.
- Because converting to MPEG takes a long time, (at least four times as long as the movie length and even longer on slower machines), we suggest you run this job overnight.
- Once the burn has completed successfully, test the disc on the type of equipment your audience will be using, especially before making multiple copies.
- iVCD FAQ
- iVCD Read Me (pdf) – also included in the app download
- iVCD Specifications and System Requirements
- iVCD Tutorials
- Download iVCD Now
- Contact Support
Take the Next Step
Get It Now
Get it now
$29.95 US
Download Trial
Download
Free Trial