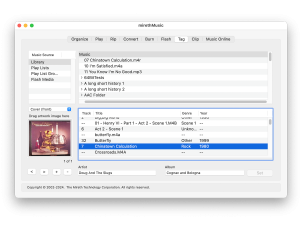
click to enlarge
The Tag tab allows you to easily manage the meta data for your tracks and is divided into 5 main areas: the Music Source list, the Selected Source pane, the Track list, the Album Art Image pane, and the Buttons. How to use each area is described below. You can tag tracks from anywhere.
The Tag Pane Interface
The Music Source list
Displays all track sources
- Library,
- Play Lists
- Play List Groups
- Flash Media such as USB thumb drives or compact flash memory that you have connected to your computer
The Selected Source Pane
When you select a Music Source, mirethMusic will display all the sources of that kind in the Selected Source pane. For example, if you selected “Play List”, all your Play Lists will be displayed. Use the Selected Source Pane to select the tracks to display in the Track List.
The Track List Pane
The Track list displays the tracks you can work with. Click, shift-click, or apple-click to select the tracks.
The Album Art Image Pane
When you select a Track, mirethMusic displays the Album Art for that track in the Album Art Image pane.
You must select a track to view Album Art. If you select multiple tracks, the Album Art from the first track that was selected will be displayed.
To view Album Art
- Select a track
- Click the [<] or [>] buttons to display the images
To Change Album Art
- Select a track
- Click the [<] or [>] buttons to display the image that you want to change
- Choose the image type from the popup menu above the image
- Drag a new image over top the old image and drop the new image to make the change
To Add Album Art
- Select a track
- Click the [+] button
- Choose the image type from the popup menu above the image
- Click the [<] or [>] buttons to display the image that you want
To Delete Album Art
- Select a track
- Click the [<] or [>] buttons to display the image that you want to delete
- Click the [-] button
How to Navigate
To select Tracks using the Music Source List
- In the Music Source list, click on the music source type. When you select a Music Source, all the sources of that kind will be displayed in the Selected Source pane. For example, if you selected Play List, all your Play Lists will be displayed.
- In the Selected Source pane click, shift-click, or apple-click to select the items. When an item is selected in the Music Source pane, the tracks in the selected source(s) are displayed in the Track List pane.
- In the Track List pane click, shift-click, or apple-click to select the tracks.
To select Tracks using the Drag and Drop
- Go to the Finder
- In the Finder click, shift-click, or apple-click to select tracks
- Drag the tracks from the Finder to the Selected Music source pane
How to Tag
mirethMusic will tag MP3, OGG, AAC, M4A, M4B and M4R track files.
To update the Album tags
- Click the Tag tab
- Navigate to the Album. (For further information, see “How to Navigate“ above.)
- In the Selected Source Pane, select the Album.
- In the Track List, Single-click, Shift-click, or Apple-click to select the track(s) you want to modify the Album tags for. Usually, this is done for all the tracks on an album at the same time.
- Edit the Artist and Album tags by clicking in the text box and making the change.
- To save your changes, click the “Set” button. The Artist and Album tags will be changed for all the tracks you had selected.
To update track tags
- Click the Tag tab
- Use the Source Pane and Selected Source Pane to navigate to the track. (For further information, see “How to Navigate“ above.)
- To change text tags for a track, double click the text and type a new value.
- To change the Album Art, refer to the “The Album Art Image Pane“ section above.
- To save your changes, click the “Set” button or click on a different track and the new values will be saved.
To tag multiple tracks with the same Album Art
mirethMusic allows you to apply the Album Art tags from one track to a group of other tracks. This is a convenient way of tagging all the tracks from the same album with the same Album Art
- Click the Tag tab
- Use the Source Pane and Selected Source Pane to navigate to the album and select it. Ensure all the tracks you want to tag a in the Track List (For further information, see “How to Navigate“ above.)
- In the Track List, select the first track you want to modify the Album Art for.
- To change the Album Art, refer to the “The Album Art Image Pane“ section above.
- Single-click, Shift-click, or Apple-click to select the remaining tracks that you want to tag.
- To save your changes, click the “Set” button. The Album Art tags will be changed for all the tracks you had selected.
mirethMusic Help
- Read the FAQ
- Go to the mirethMusic Tutorials
- Read the mirethMusic Documentation
- Refer to the mirethMusic Specifications and System Requirements
- Download mirethMusic
- Can’t find what you’re looking for? Contact Support
Your Next Step
Get It Now
mirethMusic – Available from The App Store
Get It Now
Get it now
$24.95 US
Download Trial
Download
Free Trial