- How to Rip a CD
- How to Rip a CD to more than one format at a time
- Advanced rip settings
- How To Edit Track Information when ripping
- How To Edit Clip Information when ripping
Instructions: How to rip a CD on Mac to MP3, AAC and more
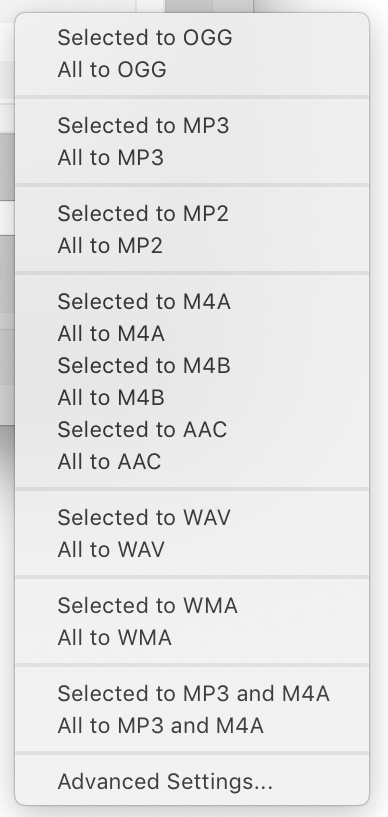
You can use mirethMusic to rip a CD on macOS. You can rip the entire CD or just the selected tracks. You can rip to one format or to more than one format at the same time. You can rip the entire CD or just the selected tracks. mirethMusic can rip to the following formats:
– AAC
– MP2
– MP3 (To rip to MP3, you need to install the LAME component. See the System Requirements)
– M4A
– M4B
– OGG
– WAV
– WMA
To rip, follow these easy steps:
- Insert CD
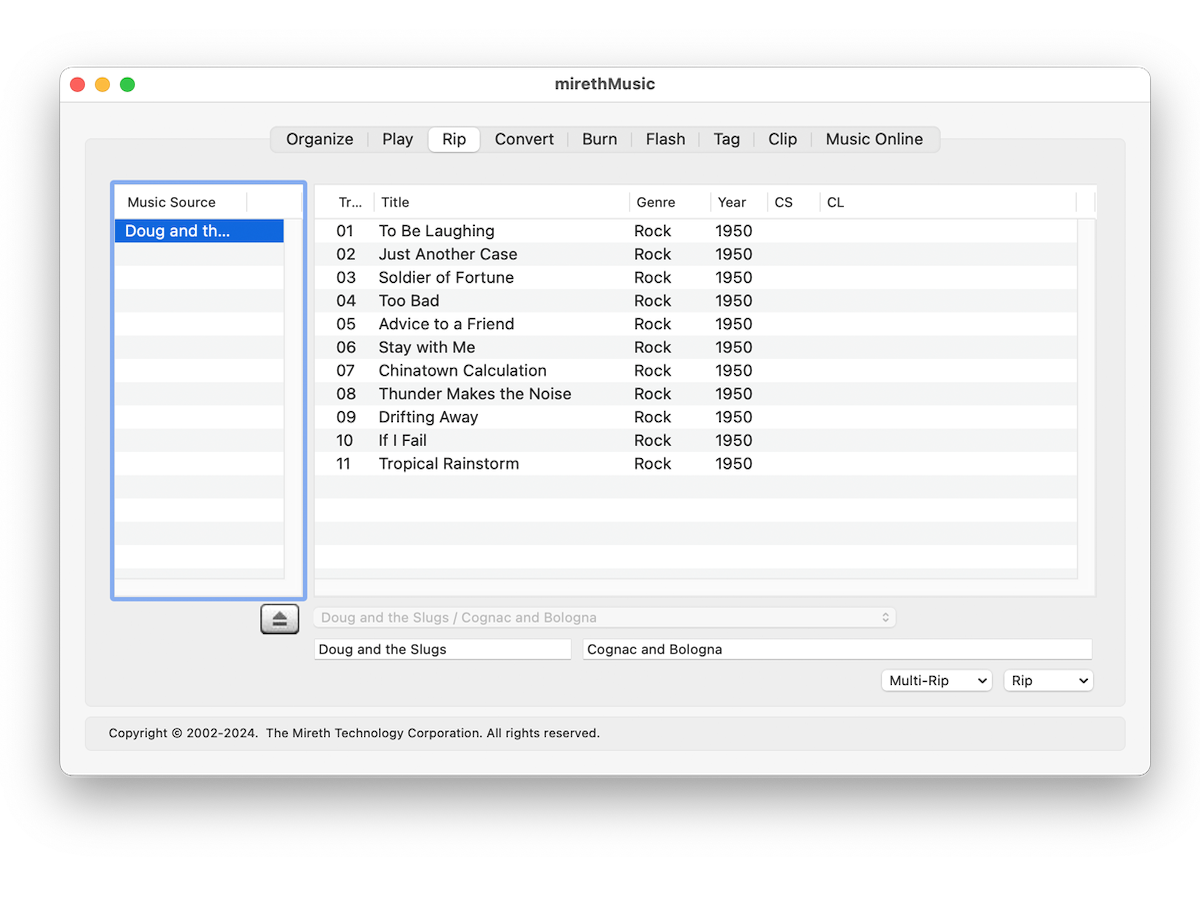
Insert an Audio CD into the CD drive. If it is playing, click the Stop button on the Play tab to stop it. (You can’t rip a CD while it is playing.)
- Click the Rip Tab

- Configure quality and File Name, if required.
If required, use the Advanced Settings to reconfigure the Quality and Ripped File Name format. Remember that the better the quality you choose the larger the file will be on your hard drive. For further information, refer to the mirethMusic Read Me (pdf)
- Select tracks
To rip just some Tracks, select those tracks (shift or apple click to select multiple tracks), click the Rip drop down menu and select the menu item titled Selected To [desired format].
To rip the entire CD, click the Rip drop down menu and select the menu item titled All To [desired format]. - Save
Select the folder where the ripped files should be stored and click the Save button

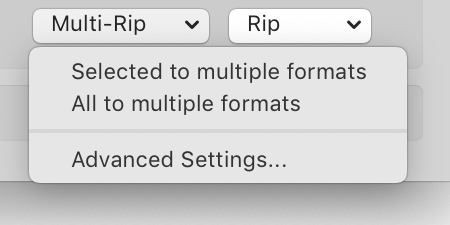
How to rip a CD to more than one format at the same time
- Insert an Audio CD into the CD drive. If it is playing, click the Stop button on the Play tab to stop it. (You can’t rip a CD while it is playing.)
- Click the Rip tab.click to enlarge
- Click the Multi-Rip Menu. Use the Multi Rip > Advanced Settings to configure which formats to rip to and which folder to put the ripped tracks in.Format Tick Box: Tick which formats you want to rip to.Folder Set Button: Use the “Set” Button to chose the folder to rip the tracks to. Then press the “Save” button.
- If required, edit the track information. For further information, refer to the mirethMusic Read Me (pdf)
- If required, edit the clip information (only if you’re making a clip). For further information, refer to the Music Man Read Me (pdf)
- To rip just some Tracks, select that track (shift or apple click to select multiple tracks), click the Multi-Rip drop down menu and select the menu item titled Selected To Multiple formats.To rip the entire CD, click the Multi-Rip drop down menu and select the menu item titled All To Multiple formats.
Advanced Rip Settings
The Rip->Advanced Settings… menu item allows you to configure the rip quality and the ripped file name format. You may alter these setting at any time prior to ripping. You only need to alter them once.
You can use Advanced Settings to adjust the rip quality, configure the automatic creation of Artist and Album sub-folders, and configure the format of the file name that will be used when CD tracks are ripped. The settings available depends on which audio format you are ripping to (MP#, OGG, AAC or WMA). You can also configure automatic MP3 clip production.
- Quality Slider: Slide the Quality slider to your preferred quality. Remember that the better the quality you choose the larger the file will be on your hard disk. Default: CD Quality
- Maximum Speed (disable cdparanoia error checking). Enable this option to rip tracks faster but at a lower quality if the CD is damaged. Default: Off
- Enable this option to mix down the stereo tracks to mono so that both speakers (or earphones) contain all the music. Stereo effects will be lost. Default: Off
- Variable Bit Rate MP3 (instead of average bit rate). Enable this option to create VBR MP3s. Default Off.
- Automatically place music in Artist and Album sub-folders: Enable this option to automatically store ripped tracks in Artist and Album subfolders. You do not need to create these folders, Music Man will do it automatically. This feature requires information from FreeDB. Default: Off
- Place music in file extension folders. Enable this option to automatically store ripped tracks in a subfolder that uses the same 3 letters as the file extension. Defautl: Off
- Shift folder names to lower case. Enable this option to automatically shift the characters in the folder name to all lowercase letters. Default: Off
- Remove spaces from folder names. Enable this option to automatically remove any spaces from folder names. Default: Off
- In Filenames: Replace | With. Add any customer character replacements that you want in this table. Default: None
- Song file name format: Select the format you would like the ripped song names to use. This feature requires information from FreeDB. You can use a custom formatting string that recognizes the following tokens and character case shifting for replacement from tags:[Artist] – Artist exactly as specified
[ARTIST] – Artist in upper case
[artist] – Artist in lower case
[Album] – Album exactly as specified
[ALBUM]] – Album in upper case
[album] – Album in lower case
[Titile] – Title exactly as specified
[TITLE] – Title in upper case
[title] – Title in lower case
[Ext] – File extension in upper case
[EXT] – File extension in upper case
[ext] – File extension in lower case
[Track] – Track numberExamples:
[Track] – [TITLE].[EXT] could produce: 00 – SONG TITLE.MP3
[Track] – [Title].[ext] could produce: 00 – Song Title.mp3Default: Track # Name. - Automatically create MP3 clips: Check this box to automatically create an MP3 clip when you rip a song. Customize the clip using the following settings:Start – select when in the track to start the clip (e.g. A start time of 0 will start the clip beginning of the track)
Length – select how many seconds long to make the clip (e.g. A length of 30 creates a 30 second clip)
Fade In – select how many seconds of fade in (e.g. A Fade In of 1 creates a 1 second fade in at the beginning of the clip)
Fade Out – select how many seconds of fade out (e.g. A Fade out of 1 creates a 1 second fade out at the end of the clip) - Compress using background tasks. Max Simultaneous tasks: Check this box to enable background compression using multiple tasks. This option will speed the process of Ripping but may slow down your computer for other tasks. By default the Max simultaneous tasks will be equal to the number of processing cores in your computer but you can adjust it to any value that you like.
Your computer may become un-responsive if you allow too many simultaneous tasks. If you are not sure what to choose do not modify this value.
- Cache folder. Select the folder where you want mirethMusic to store temporary files that are needed to compress using background tasks. The default is in your home folder, in Library, in Caches
How To Edit Track Information when ripping
When you insert an Audio CD, mirethMusic will look up the CD title and artist as well as the track title and other information. (This can be disabled in the preferences.) You can edit the information returned from FreeDB before you rip.
Sometimes FreeDB will return more than one possible CD Title and Artist. You can pick the one you want using the FreeDB PopUp Menu, or you can edit the information in the FreeDB Album information fields.
- To edit the Album information, highlight the information in the Artist or Album name field and edit it.
- To edit the track information, highlight the information in the field for that track (Track Number, Title, Genre, Date) and edit it.
How To Edit Clip Information when ripping
When you rip a track, mirethMusic can automatically make a clip. You can specify the Clip Start (CS) point and the Clip Length (CL) for the clip that you want to create. To specify other clip settings, use the CLP.MP3 Tab of the Advanced Settings under the Rip Menu (Rip tab > Rip pop up menu > Advanced Settings > CLP.MP3 tab
mirethMusic Help
- Read the FAQ
- Go to the mirethMusic Tutorials
- Read the mirethMusic Documentation
- Refer to the mirethMusic Specifications and System Requirements
- Download mirethMusic
- Can’t find what you’re looking for? Contact Support
Your Next Step
Get It Now
mirethMusic – Available from The App Store
Get It Now
Get it now
$24.95 US
Download Trial
Download
Free Trial