Instructions: How to install ShredIt X on Mac
To install ShredIt X on Mac, follow these easy steps:
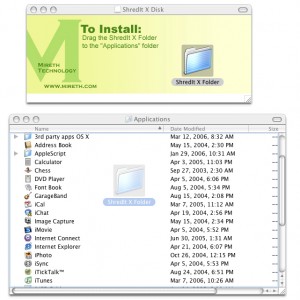
- Move ShredIt X to your Apps Folder.
If you haven’t already done so, download ShredIt X. (https://mireth.com/zip/shreditx.dmg.zip)
To unzip the zip file, double-click it.
To open the dmg file, Double-click it.
Then Drag the ShredIt X folder to your Applications Folder.
- Open the App.
To open ShredIt X, double-click the icon.
- Register.
The Registration dialog will appear when you launch the program.
Enter your Registration Information | Serial Number and Click “Register”.
– The easiest way to do this is to copy (Ctrl C) and paste (Ctrl V) the information from the email we sent you.
– If there is a problem with the registration information, the “Invalid Registration Information” dialog will appear. To correct the problem, refer to the “ShredIt X FAQ”.
– If you don’t have Registration Information, Click “Buy Now”. - Put ShredIt in a convenient place.
If you’re going to use ShredIt X often, put it in a convenient place, either by putting an alias on the desktop or by putting ShredIt X in the dock.
To put an alias to ShredIt X on the desktop, follow these steps:
– Select the ShredIt application by single-clicking the ShredIt Icon.
(Ensure that you select the ShredIt application, not the entire folder. The application is called “ShredIt X” and has a shredder icon. The folder is called “ShredIt X Folder”, has a folder icon and contains the application and the documentation folder.)
– From the File menu, select Make Alias. Drag the “ShredIt X alias” to a convenient place on the desktop
To put ShredIt X in the dock,
– Drag the ShredIt X icon to the Dock.

Now you’re ready to Shred Files, Folders, Free Space and more. For further information, refer to the rest of these Tutorials.
ShredIt X Help
- Read the FAQ
- Go to the ShredIt X Tutorials
- Read the ShredIt X Documentation
- Refer to the ShredIt X Specifications and System Requirements
- Download ShredIt X
- Can’t find what you’re looking for? Contact Support
Take the Next Step to Protect your Privacy
Get It Now
Get it now
$24.95 US
Download Trial
Download
Free Trial